Fantasy Room Level 1 - Dream Hotel Lobby
Step into fantasy hotel rooms, where every hotel room fantasy begins with a lobby full of warmth, inviting guests to relax and feel at home as soon as they enter. - Fantasy Room Level 1 Strategy & Solutions
Important Notice
Due to level number adjustments in the app and different update progress between iOS and Android platforms, the text guide below may not match the images and videos above. Please prioritize images and videos. If you find that the guide content doesn't match your current level, please visit View All Level Walkthroughs to find the correct guide through images. Thank you for your understanding.
Level Introduction
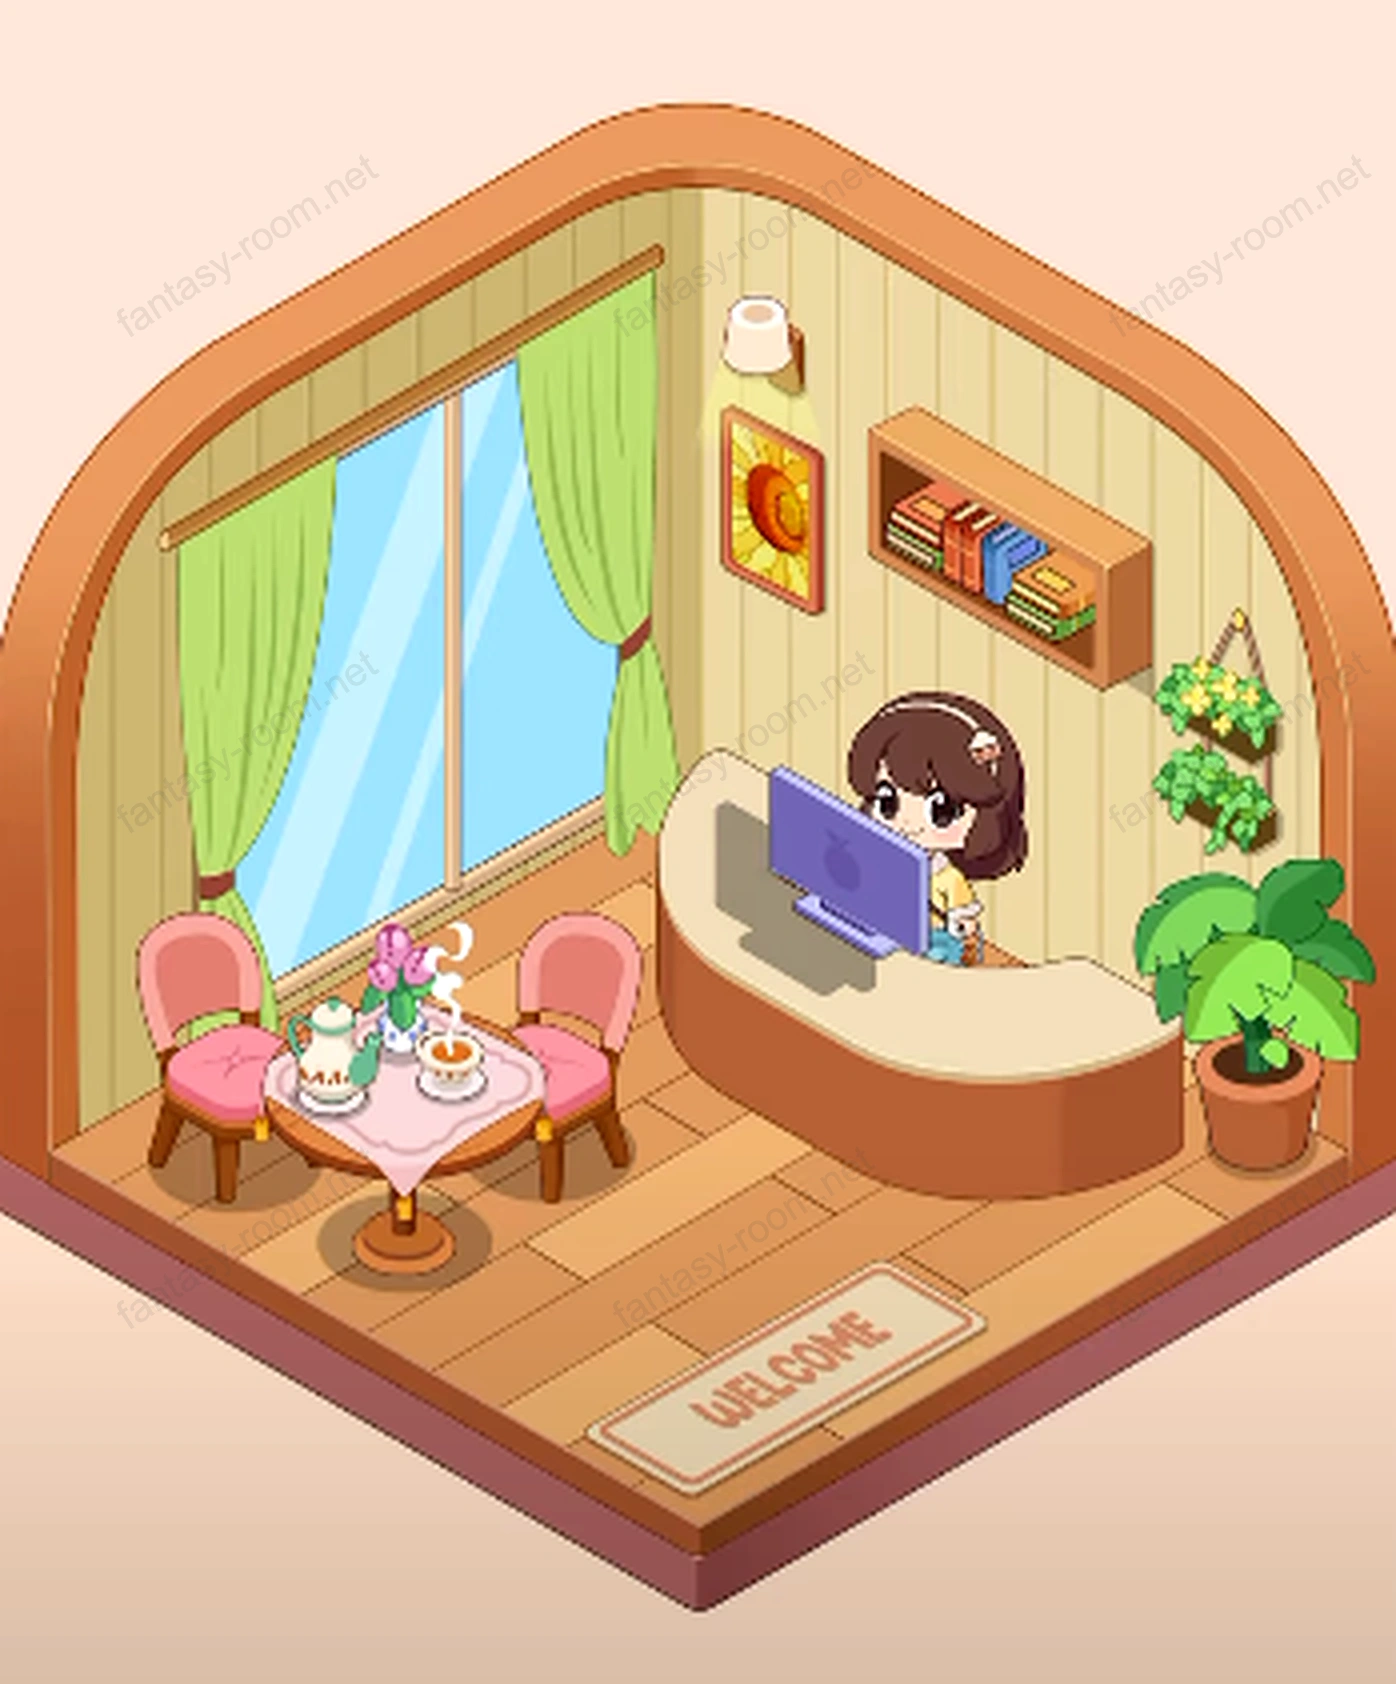
This level mainly familiarizes players with basic operations of unpacking, adsorption and rotation. Room divided into right side front desk office area and left side window tea break area, need you first decorate wall well, then arrange front desk, characters, tables-chairs and tea snacks in sequence, making entire space look like a small reception room waiting for guests. As long as slowly place in order, can pass at once.
Steps
Step 1: Lay foundation room
First set floor into light wood floor, wall choose beige or light wood grain vertical wall panels, this makes later green curtains, pink chairs appear gentle, not abrupt.
Step 2: Install left large window
Left wall middle slightly forward position place large area floor-to-ceiling window, let light shine in from this direction. Window frame must be parallel with wall, appear adsorption prompt then release.
Step 3: Hang green curtains
Window upper hang complete set of light green curtains, both sides symmetrical, hem naturally drooping, use pink tie belts to fix, making front area bright and beautiful.
Step 4: Place curved front desk
Drag front desk to room right forward position, straight side stick close to right wall, arc side face inside room. Front desk place relatively straight, avoid later character sitting in overlapping with front desk.
Step 5: Character and computer in position
Place character into front desk middle position, then place purple computer monitor at front desk center. Computer base fall desktop center, character expose upper body, look like working.
Step 6: Install wall bookshelf
Behind front desk wall slightly right position install suspended bookshelf. After installing put several books and decorations inside, pay attention not too low, leave left side for decorative painting.
Step 7: Hang sunflower decorative painting
Shelf left side hang sunflower pattern picture frame, painting slightly higher than bookshelf, making wall more layered, also pulling vision from right back to center.
Step 8: Install small wall light
Above decorative painting add small wall light, light center and painting center basically on same vertical line, light beam point toward front desk position, making entire work area more warm.
Step 9: Right corner place potted plant
Front desk outside bottom right corner place large green plant flower pot, let it keep little distance with front desk, neither blocking people, nor filling right empty space.
Step 10: Wall add hanging green plant
Above right bookshelf hang another hanging green plant, position not too low, avoid overlapping with bookshelf, character head, this touch makes wall more lively.
Step 11: Lay welcome floor mat
Entrance leading to front desk lay floor mat written WELCOME, text face inside room, look like small front desk specifically welcoming guests.
Step 12: Place window front small round table
Return to left side, window front place round small tea table, desktop roughly below window midline slightly, convenient for later placing tea set.
Step 13: Two pink chairs in position
Small round table left and right each place pink chair, seat slightly face table center, leave angle can sit down, chair legs not press table leg shadows.
Step 14: Place tea set and desserts
Finally on round table place tea pot, tea cups, cake and small flower vase, tea pot center, snacks and flowers as embellishment, this step makes tea break area look more life-like.
Attention Matters
- Avoid items blocking each other, wall decorations arrange according to bookshelf, decorative painting, wall light order, wrong order will appear unable to stick situation.
- Wall-attached furniture adjust angle first then attach wall, especially front desk and curtains, slightly skewed affects later items adsorption.
- Small objects wait large objects completely adsorbed then place, front desk not stuck straight, table not centered, don't rush placing tea set.
- Plants and front desk keep certain gap, otherwise characters or prompt area may be blocked.
- If red frame or items bounce back, usually previous furniture not adsorbed successfully, go back realign that large object.
Tips and Tricks
- First arrange wall, then arrange ground, then place desktop small objects, this order least chaotic.
- Drag items near position, don't suddenly release, pause one second wait adsorption prompt appear, release more stable.
- Tables-chairs, floor mats need alignment furniture, switch slightly top-down angle to place, position easier see clearly.
- If find desktop tea set always squeeze together, can first enlarge round table, then place tea pot, finally place flowers, less easy bounced by system.
- At key points preview overall first, see right front desk and left tea area balance weight, right too empty then add another green plant.
This level core lies in familiarizing "first large then small, first wall then ground, first structure then decoration" arrangement rhythm. As long as front desk, character, bookshelf vertical line place stable first, then do left window tea break area, overall will be very harmonious. After completion room simultaneously possesses work sense and life sense, looks like small office can receive guests anytime, also gives players sense of achievement arranging successfully immediately after entering game.