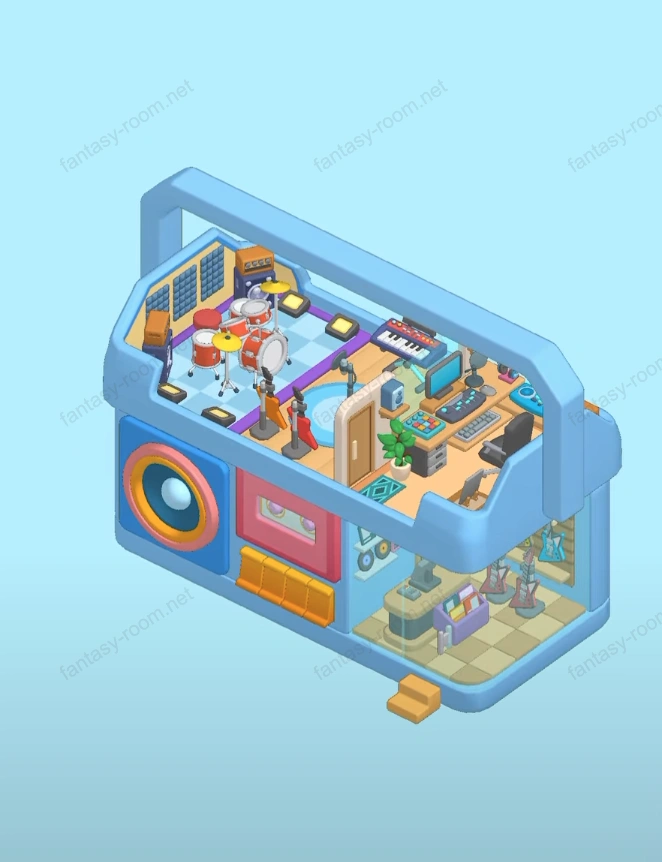
Fantasy Room Level 134 - Music Studio
Level 134 theme is "Music Studio", overall uses blue walkman shape as exterior design, interior space like a music world full of rhythm and creativity. Room uses blue and orange as main color tones, full of tech feeling and youthful vitality. Scene divided into recording area, musical instrument display area and creation space three major parts, covering guitar, drum kit, keyboard, speakers, mixing console and other elements, perfectly presenting entire process of music production and performance. Keywords can include: music studio, recording studio, rock instruments, guitar rack, walkman room design, rhythm creative space, music production theme. - Fantasy Room Level 134 Strategy & Solutions
Important Notice
Due to level number adjustments in the app and different update progress between iOS and Android platforms, the text guide below may not match the images and videos above. Please prioritize images and videos. If you find that the guide content doesn't match your current level, please visit View All Level Walkthroughs to find the correct guide through images. Thank you for your understanding.
This level uses walkman shell as framework, interior arrangement exquisite and layering obvious. Lower floor is musical instrument display and sales area, upper floor is recording and performance space. Overall style modern and rich in rhythm, lighting and color create immersive music atmosphere. Players need to through reasonably placing musical instruments, sound equipment and character roles, making studio visually both professional and full of vitality.
Step 1: Build walkman main body structure
Keep default blue shell and orange details, forming unique portable music space appearance.
Step 2: Arrange lower floor musical instrument display area
Place guitar rack at lower right corner, hang multiple electric guitars, forming neat display wall.
Step 3: Set cashier counter and front desk area
Place cashier counter and small counter at lower floor center, place microphone and music sheets on counter, adding commercial and music atmosphere.
Step 4: Decorate walls and record details
Hang records and tape decorations on left wall, echoing walkman theme, enhancing retro feeling.
Step 5: Add display stand and small items
Place speakers, headphone boxes and ornaments on counter surface, making space richer.
Step 6: Set upper floor recording and creation space
Through stairs or platform transition to upper floor, place microphone and keyboard in center, forming main creation area.
Step 7: Place drum kit and sound equipment
Place complete drum kit and speakers at upper left corner, forming rhythm core.
Step 8: Arrange DJ equipment and mixing console
Arrange mixing equipment, mixer and headphones at upper right corner, highlighting professional recording studio atmosphere.
Step 9: Place guitar stand and stage details
Place guitar stand on central round floor mat, making stage visual center more prominent.
Step 10: Decorate walls and lighting system
Install wall lamps and spotlights, making entire upper floor stage area more dazzling.
Step 11: Place keyboard and music stand
Add electronic keyboard and music stand beside drum kit, adding music variety richness.
Step 12: Perfect DJ area details and tech elements
Add computer display screen, headphones and mixing console connection wires on right side, making operation more realistic.
Step 13: Place character and action details
Arrange musician, DJ or drummer character performing, enhancing scene vitality.
Step 14: Arrange background speakers and subwoofer
Set large speakers and subwoofer in corner, creating live performance atmosphere.
Step 15: Optimize space zoning and layering
Keep upper floor performance area and lower floor display area layout distinct, flow line smooth.
Step 16: Supplement green plants and wall decorations
Add small potted plants or neon light signs at edges and corners, softening hard colors.
Step 17: Adjust lighting and shadow layers
Let blue lighting dominate overall atmosphere, supplemented by warm light embellishing equipment.
Step 18: Add carpet and ground details
Lay blue round carpet at stage center, enhancing area feeling and warmth.
Step 19: Fine-tune equipment proportions and angles
Ensure guitar, drum and DJ equipment angles natural, avoid blocking visual center.
Step 20: Overall check and final optimization
Confirm equipment placement reasonable, light shadow balanced, character actions coordinated, forming complete music space.
Tips
- •This level core is "rhythm and layering". Should pay attention to keep upper and lower floor visual zoning obvious, meanwhile use light shadow to strengthen stage effect.
- •Suggested blue and orange proportion keep at about 7:3, to highlight refreshing yet dynamic space atmosphere.
- •Neon lights or spotlights should concentrate illuminating central instrument area, enhancing stage focus.
Warnings
- ⚠Guitar and drum kit placement should keep balanced, avoid one side visual too heavy.
- ⚠Mixing console and speakers should not be too close, otherwise picture layers will be chaotic.
- ⚠Lower floor space should keep simple, highlighting instrument display and sales atmosphere.